Getting Started
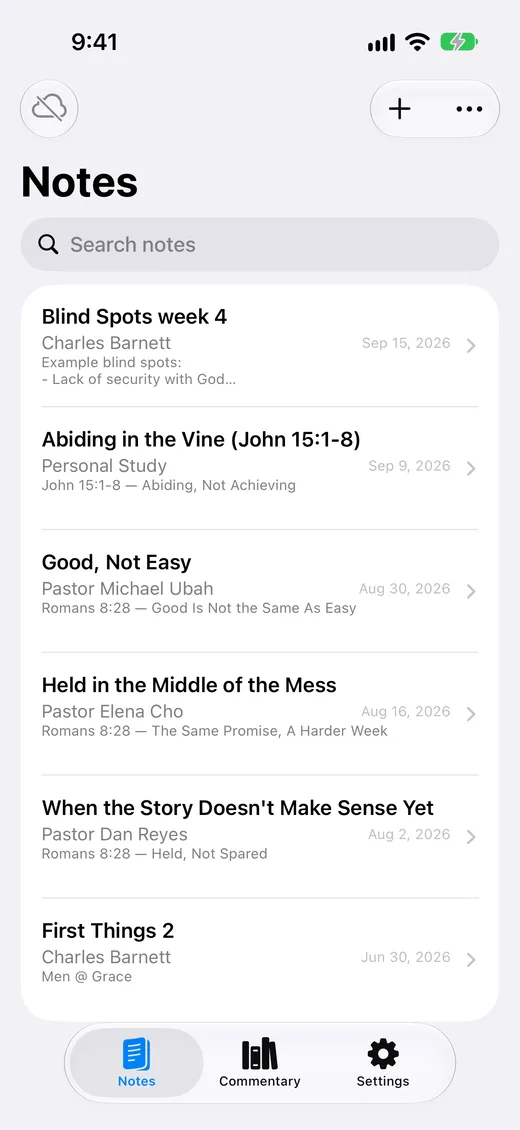
Nota Scriptura is a note-taking app for sermons and Bible study. You write your notes, and the app connects them to the Bible passages you mention. It works on iPhone, iPad and Mac.
1. Write your first note
Tap the + button (New Note) at the top of the Notes list. On the Mac, press ⌘N. Give the note a Title, then fill in the Speaker (the app remembers speakers you have used and suggests them as you type) and the Date (tap the date to pick a different day). Then just write. Your note saves itself as you go. Use Bold, Italic and Underline from the bar above the keyboard (iPad shows it on the screen; on a Mac use ⌘B, ⌘I, ⌘U).
2. Bible references turn blue
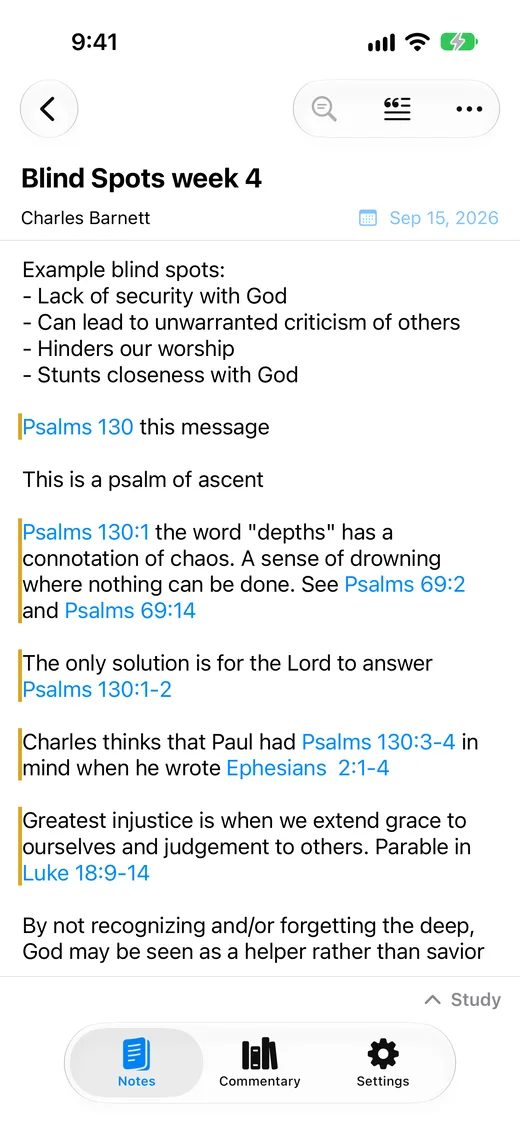
Type a reference the way you would write it by hand and, after a short pause, it turns blue. That blue reference is now linked to the passage. Formats that work:
- A single verse: John 3:16
- A range: Romans 8:28-30
- A list of verses: John 3:16,18
- A range across chapters: Acts 20:5-21:18
- Abbreviations: Gen, Ex, Ps, Matt, Rom, 1 Cor, I Cor, Eph, Phil, Heb, Rev and many more.
- A follow-on verse: after "Romans 8:28", writing v. 30 or vv. 30-32 points to the same chapter.
Always include the chapter and verse with a colon. The short words "Is", "Am" and "So" are also ordinary English words, so write them with a capital ("Is 6:3") or with a period ("is. 6:3").
On iPhone and iPad, tap a blue reference to read the passage in a pop-up. The Peek Passage button at the top lights up whenever your cursor is inside a reference. On the Mac, when the Study panel is showing its Bible tab, click a reference to jump to that verse, or use Passage → Look Up Passage (⌘⌥L).
Want references like Mark 5 (a whole chapter, no verse) recognized too? Turn on Settings → Reference Detection → Recognize chapter references. It is off to begin with. Chapter references appear in Commentary but are not tappable.
3. The Study panel
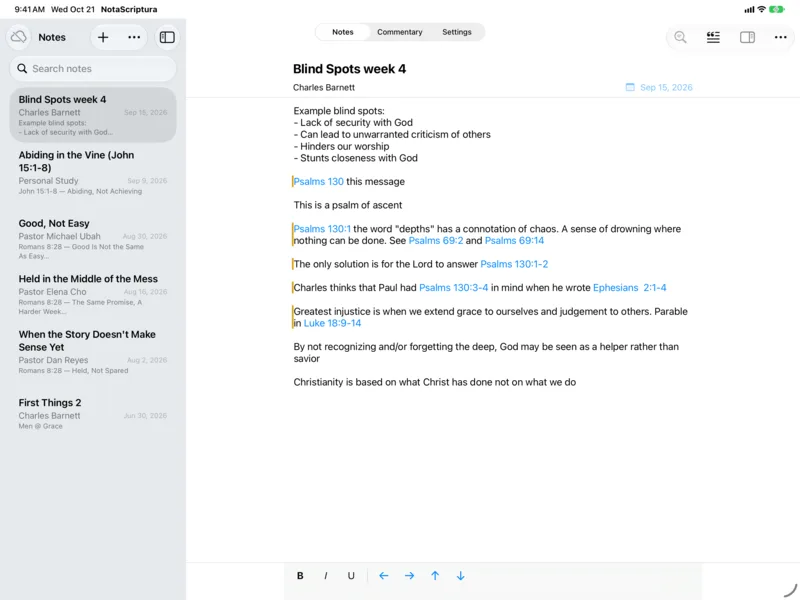
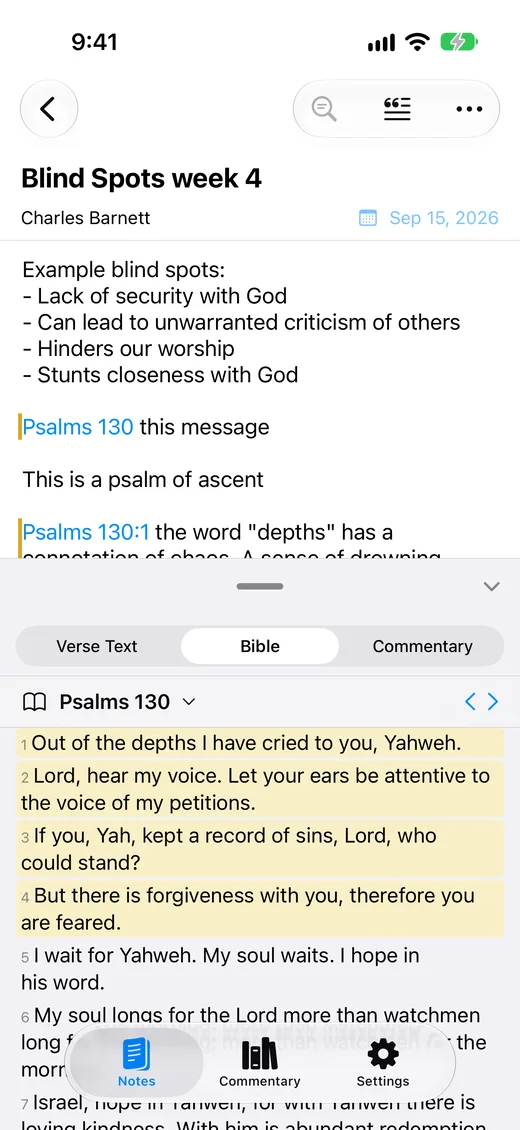
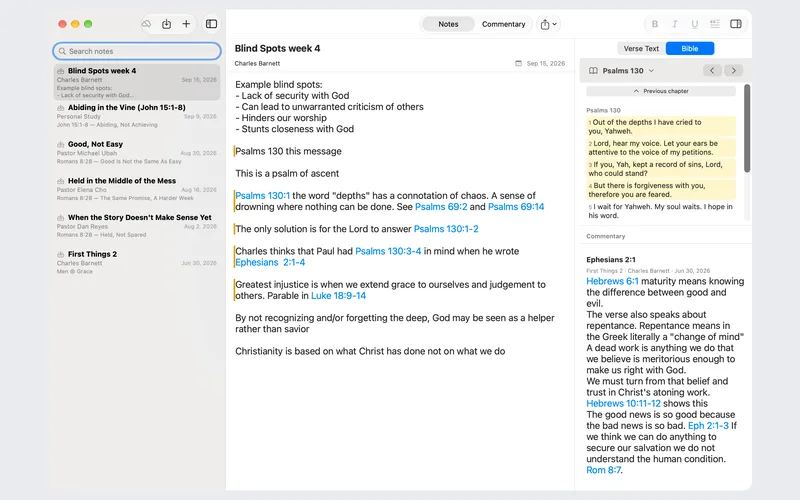
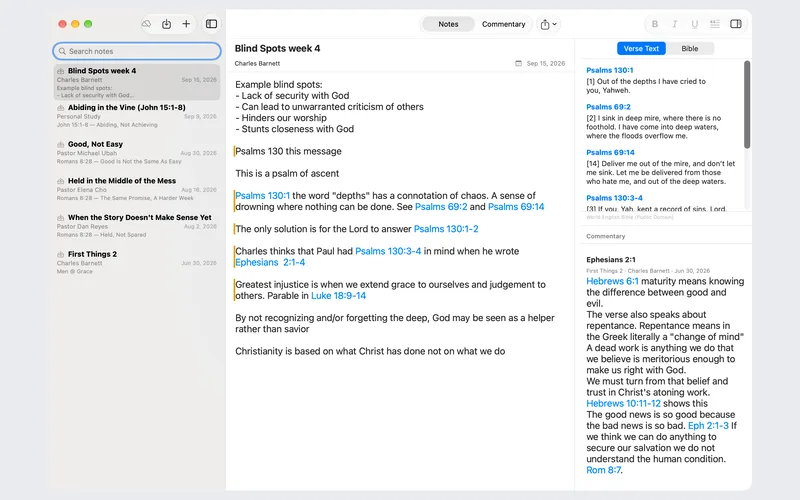
The Study panel shows the Bible text for the verses in your note, right beside what you are writing. It has three views:
- Verse Text lists each verse you referenced, with its text underneath.
- Bible shows the full chapter with your referenced verses highlighted. Arrow buttons step from one of your references to the next, and you can jump to any book and chapter.
- Commentary shows what you have written about those same verses in your other notes.
On iPhone, tap Study under your note to slide the panel up, and pick a view along the top. On iPad, the panel sits beside your note when the iPad is held sideways (use the Study Panel button at the top to show or hide it) and slides in below the note when held upright. On the Mac it is a side panel. As you scroll through a long note, the panel follows along to the verse you are reading.
4. Verse notes (the gold bar)
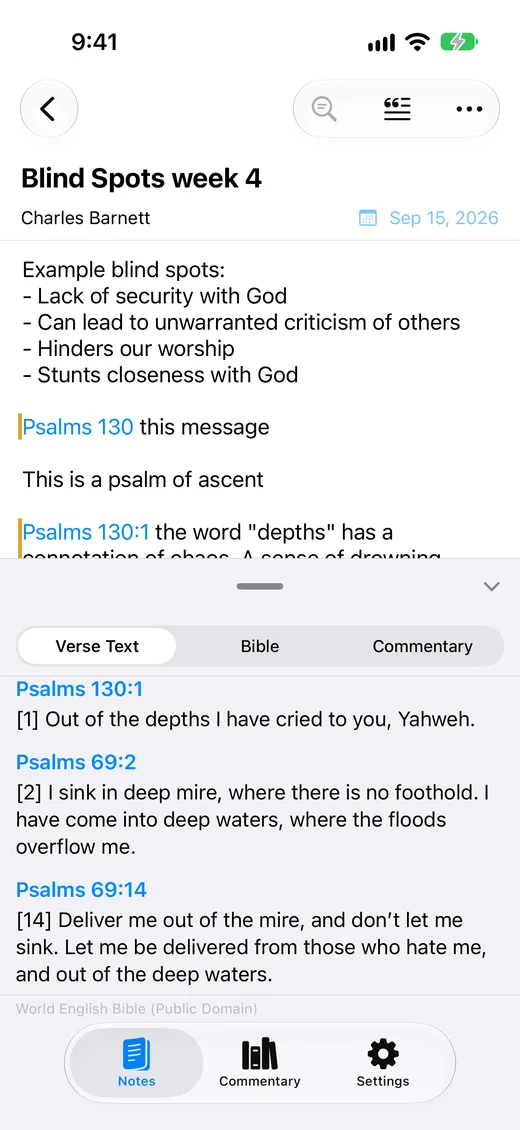
A verse note is a paragraph of your note that you want to keep as your own commentary on a passage. To make one:
- Tap Verse Note at the top of the note (Mac: ⌘⌃V).
- Tap the paragraphs you want. They are selected. To choose just part of a paragraph, press and hold at its edge and refine the selection by sentence.
- Tap Mark as Verse Note, then Done.
The paragraph now has a gold bar beside it. The selection must include at least one blue Bible reference; if it does not, the app asks you to extend your selection. To remove a verse note, tap Verse Note again and tap the small red ✕ on the gold block. Clear Selection starts over before you commit.
5. The Commentary tab
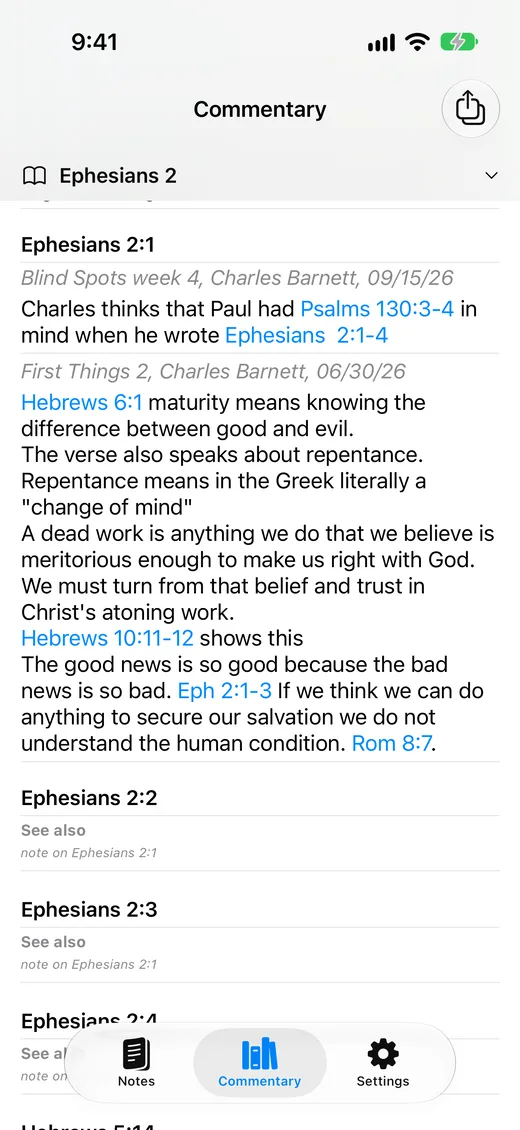
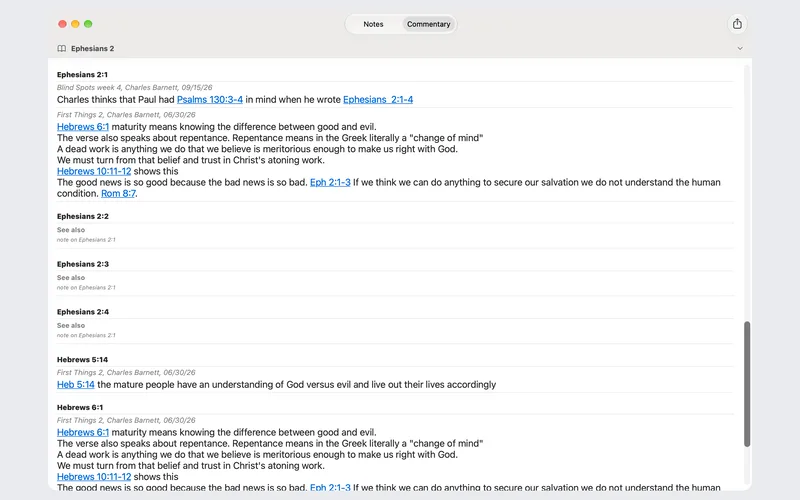
Every verse note you have ever made is gathered here, in Bible order, grouped under the passage it explains. If you have preached or studied Ephesians 2:1 five times, all five notes sit under that verse. At the top, tap the book and chapter name to jump to any book, chapter or verse. Tap the note's title (the italic line above an entry) to open that note at the right spot. Tap a blue reference in an entry to read the passage. Use Search commentary to find words inside your verse notes, and the Export button to save your commentary out of the app. Until you make a verse note, the tab shows a short reminder of how to start.
6. Search
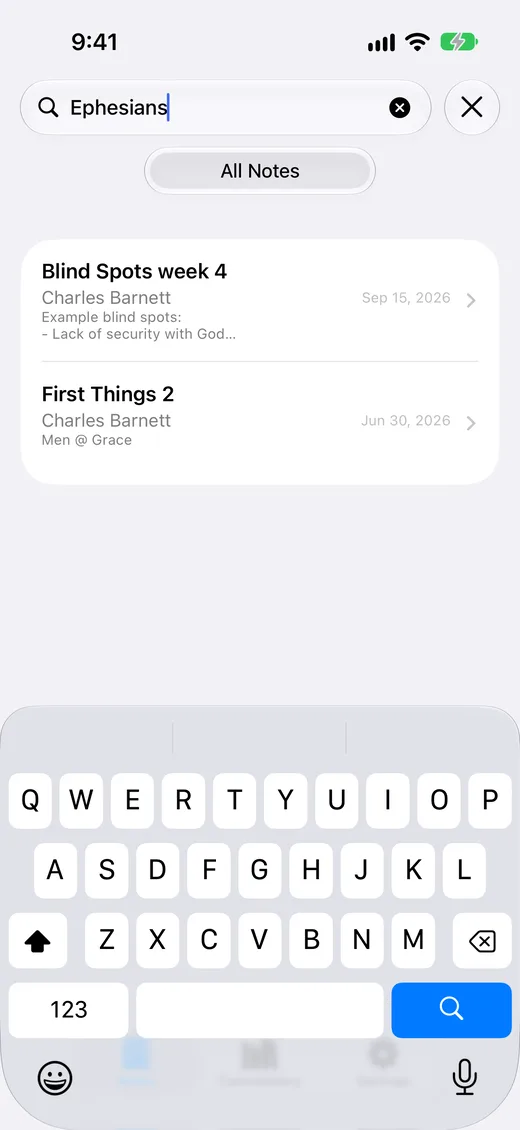
Use the search field at the top of the Notes list. You can search by:
- a book: "Ephesians" or "Eph" finds every note that cites that book;
- a passage: "Eph 2:1" finds notes that cite that verse, including notes that cite a range containing it;
- any words in a note's title, speaker or text.
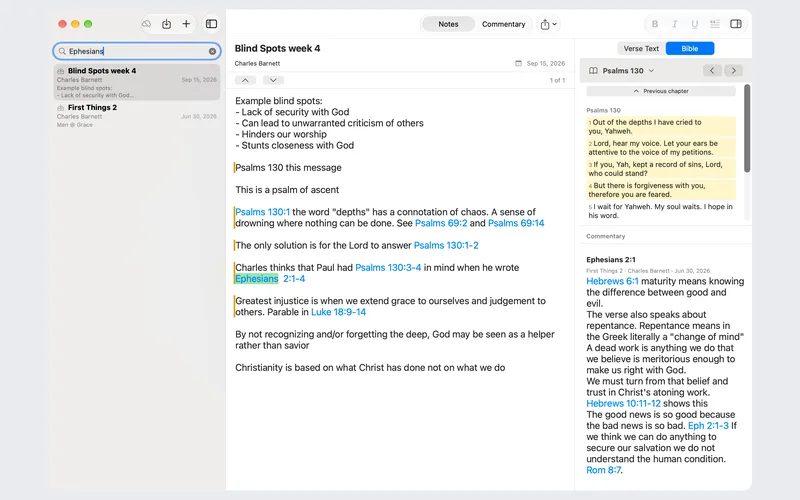
Open a result and the matches are highlighted in the note, with a bar showing "1 of 3" and arrows to move between them. Book names only match as whole words, so searching "Ephesians" will not pick up "depths".
7. Share a note, or bring one in
On the note, tap the ••• menu to find Share as RTF, Share as PDF, Share as Plain Text and Export NotaScriptura File. The last one makes a .notascriptura file that another Nota Scriptura user can open with all of its blue references and gold verse notes intact. Send it by AirDrop, Messages, Mail or Files.
To bring one in, open the file on your device. On a Mac, double-click it. The app asks whether to Import as New Note or, if you already have that note, Update Existing. You can also use Import Note in the Notes list's ••• menu.
If you do not want the note's title to show in the share preview, turn on Settings → Sharing → Hide note title when sharing.
8. Your notes on every device (iCloud)
Nota Scriptura keeps your notes in your own iCloud Drive, so iPhone, iPad and Mac stay in step with no account to create. At the top left of the Notes list, a small cloud icon shows the sync status. A cloud with a line through it means iCloud is not available and the notes are being kept on that device only. Give sync a moment after you write. Nota Scriptura also saves an automatic backup each time you open the app (at least a day apart) and keeps up to 10 copies in iCloud. Find them in Settings → Backup.
9. Where iPhone, iPad and Mac differ
- Navigating: iPhone has Notes, Commentary and Settings along the bottom. iPad puts the same three choices in a switch at the top of the screen. On the Mac, Settings opens from the Nota Scriptura menu (⌘,).
- Study panel: a slide-up panel on iPhone, beside the note (or below it) on iPad, a side panel on Mac.
- Keyboard shortcuts on the Mac: ⌘N new note, ⌘F find, ⌘B / ⌘I / ⌘U formatting, ⌘⌃V Verse Note, ⌘⌥L Look Up Passage.
- Tapping a reference: a pop-up passage on iPhone and iPad; the Study panel's Bible tab on the Mac.
Want a refresher? Settings → Show Tutorial replays the welcome tour.
Still stuck? See the FAQ or email support@2dc-apps.com.